Table of Contents
- Links
- Preface
- Contents of this Guide
- Using this Guide
- Opinionated Guide
- Sharing this Guide
- Commentary on using these Mods
- Regarding Most of the Mods
- Regarding Dalamud plugins
- Regarding Dalamud Custom Repo plugins
- Regarding XIVAlexander specifically
- Installing ACT
- Installing XIVLauncher
- Installing FF Logs Companion
- Installing Penumbra
- Installing XIVAlexander
- Installing Anamnesis
- Installing GShade
- Installing Gobchat
- Commentary on Mods Included in the Guide
Common Issues
#1 - My ACT Overlays are not working (DPS meters, CactBot alerts)
You need to update OverlayPlugin manually.
ACT > Plugins tab > note the order the plugins are listed in > click the X next toOverlayPlugin.dllto delete it > close ACT > open ACT > Plugins tab >Get Plugins...in the top right > select(86) Overlay Plugin> Download and Enable > change the order of your plugins with the arrow buttons to put it back where you found it#2 - I updated CactBot but now have no alerts or timelines
go to
Pluginstab >OverlayPlugin.dlltab > select the cactbot items on the left > remove them with the button in the bottom left > add them again with the New button and selecting the preset(s) that start with “CactBot RaidBoss”#3 - I updated CactBot but don't have the new alerts or timelines
go to
Pluginstab >OverlayPlugin.dlltab > select the cactbot items on the left > find the text field labeledURL> delete all of the text in the box to the left of the?and replace that text withhttps://quisquous.github.io/cactbot/ui/raidboss/raidboss.html#4 - Chrome won't let me download the software
Click the caret on the download and select
Keep.
Also maybe consider a different browser that steals less data and is less inconvenient - the only options at this point are Opera and Firefox; almost every other browser is built off of Chromium which always harvests, so even something like Brave isn’t viable.
Download Links
If you would just like the download links and can figure it out yourself, here you go:
SoftwareDalamud Custom Repos (right-click and
copy link)
Preface
Contents of this Guide
This is an opinionated and lay guide to setting up the following pieces of software:
- ACT: for logging FFXIV DPS
- Quick Launcher: for saving FFXIV username+password, auto-launching ACT/Alexander, and injecting Dalamud for in-game plugins
- FF Logs Companion: for uploading ACT logs to FFLogs (without Overwolf just straight mining all your data)
- Penumbra: for texture mods in FFXIV
- XIVAlexander: for killing network lag in FFXIV
- Anamnesis: for custom poses and select-any-apparel for your character, primarily for gpose
- GShade: for custom shaders for the game, primarily for gpose
- Gobchat: for more customizable and easier reading of FFXIV game chat
Each software has its own “sections”, which are the black outlined blocks that are collapsed. It is not recommended to skip any of these if you want guided through that software.
Each section has numerous “parts” with their own header which would include: specific instructions for that part, optional instructions for configuring the software if needed, skip-able explanations of features and choices, and skip-able explanations of the terms used. Some of these parts themselves are also skip-able and are collapsed.
Using this Guide
Theoretically this guide should be read all the way through in its entirety to thoroughly set up all the components you may use in modding your FFXIV, in a manner similar to how I do. You can click all of the image thumbnails to enlarge them.
Realistically, you use the Table of Contents above to learn how to properly install and configure the piece of software that had you confused - you can even read through it like a picture book, just performing the actions indicated in each image.
Either way, everything you need to get things set up and working correctly is in here, including possible fixes you may need to implement.
Ideally everything will work if you follow through each part and skip all of the skip-able parts. If that does not end up being true then read through all of the skip-able parts and that should resolve it.
If that does not work then read all of the skip-able parts you still skipped, otherwise you likely already have a way to contact me and I encourage you to do so and welcome it.
(skip) Opinionated Guide
I say this is an opinionated guide primarily because I suggest particular settings to be implemented.
In some cases, these are just what the defaults for the software should be, and every guide recommends them.
In other cases, they suit who this guide is primarily written for: which is a more casual player trying to get into raiding. As such, the settings are oriented towards an experience I am familiar with and can help with without looking at their screen, and oriented towards raiding.
Then we get to things I include like recommendations of plugins and instructions on turning down the data-mining in Overwolf which are purely opinion, and oriented exactly how my opinion is: towards me.
Just a note about myself, in case that for some reason convinces you to follow every recommendation: I’m a mid-core raider running some 30 hours a week in high-end, current content in the game, and trying to parse through all of it; additionally also RP’ing several hours a week, only made better by some plugins.
If any of that sounds like you then maybe it would be worth following all suggestions.
(skip) Commentary on using these Mods
In addition to broadly not talking about it in game: I do not suggest you recommend mods to people without them fairly specifically asking for them in addition to you being comfortable with them.
It’s pretty easy to not notice almost all of these mods, even talking somewhat generally about them (‘damn BLM damage is great’) and sharing your screen, but pointing it by asking is of course going to get it noticed.
Regarding Most of the Mods:
I.E. Quick Launcher, ACT, Gobchat, Penumbra, GShade, mostly Anamnesis, and mostly XIVAlexander.
This is system-only stuff. It won’t ever be an issue unless SE drastically changes direction with FFXIV and adds anti-cheat to it. Just don’t talk about it in-game, or harass people about their DPS, or upload NSFW pictures to a public place that displays FFXIV’s copyright in the corner.
Regarding Dalamud plugins:
It’s mostly QOL shit, but yes some of it is straight modding a multiplayer game. SE’s official stance on it is that they don’t care what’s on your own PC and don’t want to have anticheat - don’t use it to break other ToS rules, like botting (chaining macros ad infinitum) or harassment and you’ll be completely fine.
If you do not add any Custom Repo plugins you will be completely fine.
Regarding Dalamud Custom Repo plugins:
Dalamud’s default list (repository) of plugins do not contain plugins that break other ToS rules. Custom Repo plugins are something to be more wary of though, because they do have full system access. I would limit the number of plugins you use from Custom repos and try to be sensible on which versions you install.
(eg: find a plugin you think will be cool, search for its name, and choose the most-downloaded version. avoid repositories that have vast collections of plugins)
These plugins often do break other ToS rules, or may be considered to do so in general.
Regarding XIVAlexander specifically:
As said above, it’s system-only stuff addressing an issue Square and everyone else is insanely well aware of with FFXIV’s awful netcode.
BUT! If you go beyond my recommended settings of XIVAlexander, changing Network options or FPS lock options, this is not just breaking ToS and being discreet.
This is “sending a text to Yoshi’s phone saying ‘I am cheating, this is my account’”. It will likely be punished if Square takes ANY harder of a stance on mods at all, and it is almost certainly noticed now. It is not currently risky in my configuration, but outside of that is a much higher risk than pushing anything else in this guide.
Yes, it’s still just expanding upon addressing FFXIV’s netcode, but it’s doing it in a way far beyond simply that: it’s doing exactly what you would do if you were going to godmode or something to that affect.
Unfinished
This guide is not yet finished, it is still be transferred and re-formatted from it’s old home.
Only the ACT, Penumbra, and FFLogs sections are done
If you need the guide, you can see the old format here.
Installing ACT
Downloading
FFXIV needs to be in borderless window mode.
There is no problem with doing this, “Fullscreen performs better” was a DirectX10 and below thing - just do it.
Realistically, if borderless does cause problems for you for some god-forsaken reason there’s a way around this; I will tell you to stop following my guide and watch the video to figure it out later on.
Close FFXIV.
Download ACT from the first blue link on this page titled “… Setup” to download it, and just step through the install process as normal.
Note the file path to where it installs, but it is likely: C:\Program Files (x86)\Advanced Combat Tracker
Don’t open ACT.
Always Run as Administrator

We want ACT to always open as Admin, otherwise it can’t properly hook into the game or correct your firewall for you.
Press the Windows key and search for “ACT” or “Advanced”, and click the “Open file location” link.

In the opened File Explorer window, right-click the ACT file, and click Properties at the bottom.

In the properties window click the “Advanced…” button on the window that opens, and check “Run as administrator”.
Click “OK” and “Apply” and “OK”, and close the file explorer window.
Configuring ACT

Now open ACT, it should request admin permissions, grant them.
Walk through the startup wizard.
The only relevant thing is on the Parsing Plugin tab of the setup wizard:
Select FFXIV, and click “Download/Enable”.
Click through the rest.

There are these 2 buttons in the top right. They should both be grey like this, indicating they’re off.
We are not using these mini displays, and they cause issues.
(skip) If the buttons are blue-ish
Click them to turn them off to this grey-ish state.
Theoretically they are both turned off when you install ACT and do not need touched.

Go to your “Plugins” tab, and it should default to the “Plugin Listing” sub-tab.
Click the blue-text “Get Plugins…” button in the top-right.
Install the yellow-highlighted [FFXIV+others] Overlay Plugin and [FFXIV] Cactbot (in that order)

Use the arrow buttons to get your plugins in this order, and make sure they’re all enabled.
Close ACT, open ACT.

Click the “Options” tab and the “Miscellaneous” option category along the left.
Apply the same settings along the right as I have.

Open FFXIV, go hit a dummy or something to check that an entry appears in the “Main” tab of ACT.
You should see an “All” along the left, click that, and there should be rows of DPS on the right in the main part of the window.

If it did not work as expected, you may have gotten a popup from ACT asking to do a Firewall rule.
Allow it to do so.
(skip) Troubleshooting
If it still does not work, try closing and re-opening ACT - make sure it is running as an Administrator, it should have a pop-up right when you’re opening asking for permission to do so.
If it still does not work, try to use these two buttons in the “Plugins” tab “FFXIV ACT Plugin” sub-tab. Pay attention to the “Notifications” tab, it may get a number in the tab telling you there’s a notification - go read it and see if it gives you setup instructions, some common problems do.
If it still does not work, pray and google for an exclusively-ACT setup guide, paying attention to the date of the guide is wise.
(skip) Opinion on Columns to Display
Go the “Options” tab and click the “Encounter View Options” along the left, and copy these settings for a basic setup for healer, tank, or DPS.
It does involve clicking a view on the right and using the arrows to order them like this.


Go to the Plugins tab and the OverlayPlugin.dll sub-tab and click the New button to add a new overlay, such as a skill-rotation viewer, CactBot raid mechanic callouts, CactBot raid mechanic timers, oopsy raidsy to show mistakes in a raid (hit by mechanics, review what killed someone, someone missing a raidbuff, etc), and more.
(skip) How to use Fullscreen
If you insist on fullscreen, veer away at this point to go follow this video guide.
It’s an insanely long-winded guide to use a Dalamud plugin to display ACT local-webserver elements instead of normal overlay windows. You can re-convene with this guide just below to pick which overlays to use, but the resizing and options of the overlays will be done through the Dalamud plugin.

After clicking the “New” button this window will appear. This lists all of the default+CactBot overlays you can have.
Highlighted in yellow and blue are the 3 I’d recommend, but there are lots of pretty great ones for manually making your own UI.
Select one overlay, type a name for it, and click “OK” to proceed.
(skip) Furthering a Custom UI
I would recommend the DelvUI Dalamud plugin and XIVAuras Custom Repo plugin if you want to go all-out on your own UI: these overlay options are a tad bit more finnicky and you can’t customize them too much.
(skip) Configuring CactBot overlays
Click an overlay along the left, presumably the one you just added.
Note that “Enable clickthrough” and “Lock overlay” options are not checked and there’s a large display appearing with dashed borders - that is the overlay.While these options are unchecked you can move it around and resize the overlay from it’s bottom-right corner.
Once you are satisfied with it, check the “Lock overlay” option.
You probably also want to check the “Enable clickthrough” option for almost all of your overlays; the exceptions are those you WANT to click, such as oopsyraidsy and a DPS meter that has its own in-overlay settings.
When you enable both settings, most overlays will assume a minimalistic or nonexistent display.
This will change when there are mechanics, DPS, etc. Go to summerford farms, start a countdown, and then dps a dummy - those steps should allow you to test any overlay.If you find the dinging sound of CactBot Alerts to be annoying either mute ACT by right-clicking the little speaker volume thing in the bottom right of your screen on the Windows task bar, selecting volume mixer, scrolling to find ACT, and turning it down/off.
OR: Go to ACT >Pluginstab >OverlayPlugin.dllsub-tab >Cactbot Config>Raidbosssection > scroll down toX sound volume (0-1)group of settings about halfway down, and changing them to0.5for half volume for example.
For reference, these are the 5 overlays I use and their sizing on my 1080p screen.
The point is for the DPS meter, oopsyraidsy, and raidboss timeline to be fairly out of the way.
Raidboss alerts should be as front-and-center as you can deal with to make the most use out of it.All of them get the
Lock overlaysetting checked, and all except the kagerou DPS meter and oopsyraidsy get theEnable click-throughsetting checked.


(skip) Hotkey to Hide Overlays
If you want a hotkey to disable all of your ACT overlays, then click the overlay (Under
Pluginstab,OverlayPlugin.dllsub-tab), click theHotkeystab, click theAdd New Hotkeybutton, choose your hotkey (try not to overlap a FFXIV setting), set it toToggle visible/hide, and clickApply Changes.Repeat for all overlays, when all of them are showing, and boom - one hotkey turns off all the overlays at once for all those times ACT does not detect a cutscene, etc.

Installing XIVLauncher
Close ACT and FFXIV.
Download the first Setup.exe file that is from a release NOT labeled as Pre-Release from the release page.
(skip) Fullscreen
If you followed the video guide because you are forsaken, some of this will have been covered already.
I would skim through this section and go to
Configuring Dalamud Plugins. I don’t know what all is covered the video, I just know it worked for my friend, just proceed however knowing some of this will probably be duplicate information.
(skip) Terminology
Quick Launcher is a way to launch and patch FFXIV with password-saving capabilities, and can auto-launch ACT, etc.
XIVLauncher is the name of that executable program, like what it is when searching on your Windows key, etc.
Dalamud is what Quick Launcher injects into the game that gives you access to in-game plugins.


Click on More Info link when you try to run the executable.
Click the Run Anyway button.
(skip) Why does this pop up?
When you go to install the Quick Launcher executable you will get this pop-up simply because the executable is not a signed piece of software, not because Windows thinks it’s unsafe.
AKA: it means nothing.
Configuring XIVLauncher

Run Quick Launcher; the program is actually called “XIVLauncher”.
Open the Settings with the gear icon in the bottom right.

Go to the “Game” tab. Make sure your FFXIV game direction is correct. Correct it with the blue button with the ellipsis.

Go to the “Auto-Launch” tab. Click “Add new”

This is where the “Note down your ACT install location” from before comes in handy.
Again, it’s likely C:\Program Files (x86)\Advanced Combat Tracker.
Click the blue button with the ellipsis to open up File Explorer, navigate to your ACT install location, and click the long-winded executable file as shown above.
Select the Run as admin option.
Click the OK button.
(skip) Finding that File Path
If it is not: Press your Windows key, Type “Advanced”, right-click ACT, click “Open file location,” right-click the highlighted shortcut file, click “Properties” and copy the “Target” field.
It will likely look like this:
C:\Program Files (x86)\Advanced Combat Tracker\Advanced Combat Tracker.exePaste it into the highlighted field and delete the double-quotes from the beginning and end of the string.

Save your settings with the blue checkmark button in the bottom right.

These are the options to automatically log into the game.
Click the blue “Log in” button.
(skip) FFXIV on your Steam Account
If you’re running Steam FFXIV instead of mog FFXIV, make sure that option is checked.
(skip) Credential Safety
Don’t worry about your credentials being saved, it’s in the Windows credential manager, so if you use any software that saves any form of password at all:
You’re already doing the same thing.
It’s not something to worry about.
Configuring Dalamud

Open the game through Quick Launcher. This is how you will launch FFXIV now, save it to your desktop or start menu or something
Open your System menu however you do that, usually the Escape key.
There will now be options at the top of it for Dalamud.

Open Dalamud Settings.
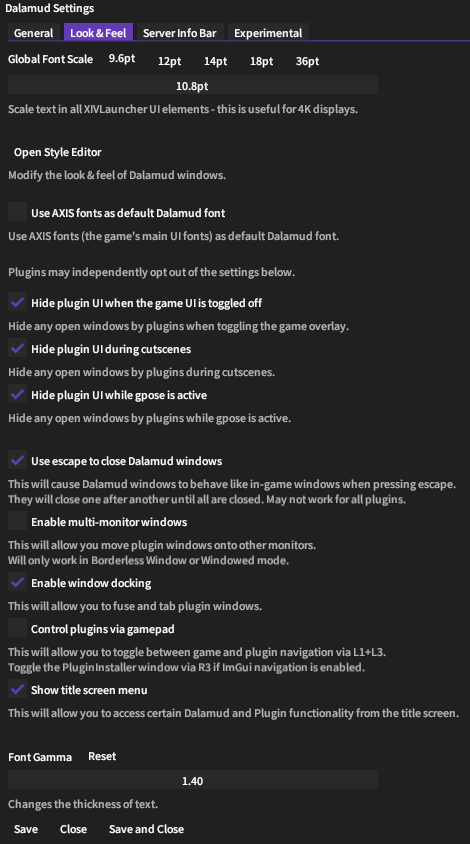
These are my General tab and Look & Feel settings for Dalamud.
The most important one to copy is the “Auto-update plugins” setting.
(skip) Just Auto-Update
Given the nature of the in-game plugins, most of them don’t contain backwards-incompatible changes that are relevant to your play style.
This is a safe option to use.

Open “Dalamud Plugins” from your system menu.
Click the “All Plugins” tab along the left, find a plugin you want (click a plugin to view more info about it, or even preview images), click install, click the gear icon to open the plugin and/or set it up.
Testing/3rd-Party Plugins
Getting Testing Plugins

If you want testing plugins (unreleased, still in-development, or the cutting-edge versions of plugins).
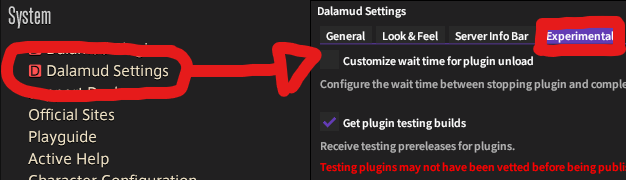
Open “Dalamud Settings” from your system menu, and go to the Experimental tab.
Click the very first option on, Get plugin testing builds.
Getting Custom Repo Plugins

Enter the link (to a .json file, usually) in the textbox that has a number next to it, click the plus button off to the right, and save.
Plugins from that repository now display under All plugins tab in the Dalamud Plugins window from your system menu.
Recommended Plugins

These are the plugins I recommend outright regardless of what you want out of Dalamud and mods in general.
They’re all just QOL, and insanely nice.
If it says “(testing)” at the end of the title in the picture then it requires testing builds of plugins to be enabled, which is the next piece just below.
If it has a little “3” in a box over the plugin’s icon then it’s from a Custom Repo. You can see 2 pieces below to see how to install those.
(or if it says in a muted color in the picture under the plugin name in the plugin body “From custom plugin repository …”)
The links to the two recommended custom repo plugins:
https://raw.githubusercontent.com/UnknownX7/DalamudPluginRepo/master/pluginmaster.json
and
https://github.com/daemitus/MyDalamudPlugins/raw/master/pluginmaster.json
(skip) Configuring Cammy
(skip) Configuring Currency Alert
(skip) Using Glamaholic
(skip) Configuring Redirect
(skip) Configuring Simple Tweaks
(skip) Using Waymark Preset Plugin
(skip) Configuring Yes Already
Installing FF Logs Companion
Close FFXIV
Download it here
Just skip through the install, it’s installing Overwolf and then will real quick install the FF Logs Companion as well.
Overall: This section is better if you follow all the configuration below and want the log uploader in game … which … like … you do.
If you don’t want it in-game or don’t want Overwolf, download the stand-alone from the blue “Windows” link on the left of this page.
(skip) Terminology
FFLogs is a website where people can view logs of fights relative to other plays - ie rankings.
FFLogs Uploaders parses ACT logs to an extent, and uploads them to FFLogs for further parsing and ranking.
FF Logs Companion is the Overwolf plugin FFLogs made that is an FFLogs Uploader.
Overwolf is a bitchy annoying software for injecting simple mods like this into games. We will be disabling most of its functionality.
A “Parse” on FFLogs is a parsed and ranked log upload which represents that a) it was logged, b) it was uploaded and ranked, and c) gives you a final number that indicates how someone did.
eg: I parsed a 97 in some dungeon - aka: I performed better than 97% of people of my class in this patch in this dungeon and it is verified and publicly verifiable online on FFLogs.
(skip) Logging random players
FFLogs is an opt-out multi-trust platform, everyone can opt-out without even having an account.
If someone has the time and care to bitch about their awful parses representing the lowest end of FFLogs metrics available then they have the capacity to go opt-out of their logs being presented there in the whole 2 minutes it takes.
If it worked any differently then it would be substantially more trivial to fake logs.
Just log and upload whatever you would like, don’t worry about the pugs.
(skip) Regarding Overwolf
Okay. FFLogs has 2 log uploader softwares. This one is the Overwolf one that is injected into the game instead of being a separate program and window entirely.
People don’t like Overwolf, which is based as fuck, and is why I’m including instructions to disable their data harvesting, which seems to be genuinely respected. This is people’s main complaint with Overwolf.
Another big part of it is that Overwolf is annoying as all hell injecting an overlay into every one of your games and asking you to install overwolf overlay plugins for specific games - both of these are disabled in my setup as well.
Configuring Overwolf

Right-click Overwolf, click Settings
Remove the hotkeys for “Overwolf Platform”.
You don’t need hotkeys for the FF Logs Companion, but I point out the one I do use.
Make sure It’s auto-launching.
(skip) Where is Overwolf
Overwolf will now live in the bottom-right of your screen, in the Windows task bar (or more likely in the sub-menu down there, opened via the caret pointing up).
(skip) Disable all Overwolf Keybinds
Everything that Overwolf does aside from being a platform for plugins can be done better by anything else.
There’s even a default Dalamud plugin for FPS display, and Overwolf’s task manager is irrelevant really … just kill Overwolf outright if you need to.
Even if it’s a feature you want, don’t do it via Overwolf.

We’re gutting overwolf, so just make sure it opens when Windows does.
Disable the Dock.
Enable Hardware Acceleration.

Disable all of the settings in the Notifications tab.

Disable all of the settings in the Privacy tab.
Configuring FF Logs Companion

Open FFXIV
This icon will be somewhere in the game Put it somewhere more convenient, it will be there all the time, and will always be visible unless you toggle it with the hotkey
Click it
Log into your FFLogs account
(skip) Creating and Linking your FFLogs Account
Sign up on the FFLogs website
Go to your settings
Scroll to
Claimed Characterssection.Click the
Import new Characterbutton.Carefully read ALL of the instructions on the page before following them.
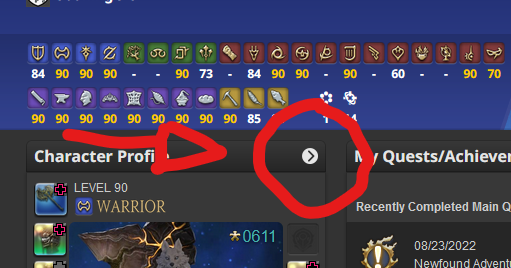
Go to your Lodestone page.
Click into your character’s actual page by clicking the circled and indicated caret.
Copy the link to the page you are on.
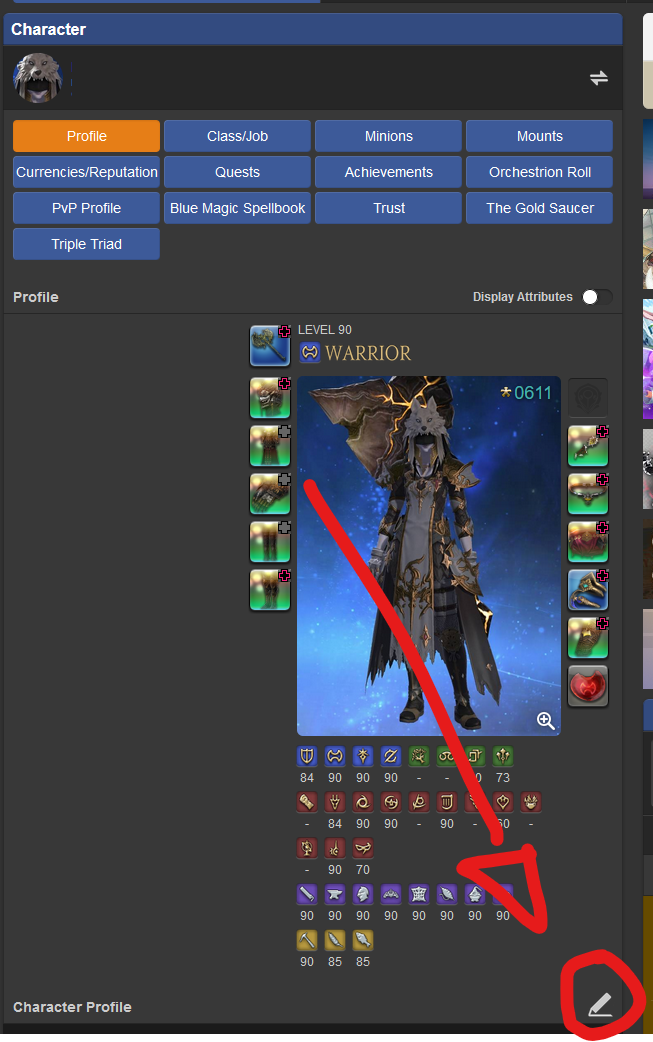
Provide the link to your character page in the FFLogs text box.
Click the circled and indicated pencil icon to edit your character.
Paste the code that FFLogs gives you into the FFXIV character edit text box.
I recommend waiting an hour or so
Click the
Claimbutton.
Logging with FF Logs Companion

This can be your main screen of the plugin.
When you want to upload a log you’ve finished (usually when you leave instance), go to this Upload a Log screen, your most recent log file will almost certainly already be filled in.
Select settings if you like, but you should make sure that its usually set to Personal Logs (versus uploading to your guild of FFLogs), and that its set to Public visibility.
Click the large blue Go button
(skip) Select Specific Raids to Upload
If you haven’t had ACT open for much, you do not need the toggle at the bottom turned on for
Select Specific Raids to Upload.However, if you’ve been playing all day, or hitting the dummy, or whatever, Use the
Select Specific Raids to Uploadtoggle.

If you’re doing continuous parsing runs, use the Live Log screen.
Just remember to turn it off when you’re done, especially if you’re uploading to your Guild instead of to Personal Logs.
While live logging, click the minimize button on the window and NOT the X button.
(skip) Include the Entire File in the Report
This will include data in the log previous to now
(skip) Enable Real-Time Uploading
This will upload as you progress through the fight (ie. If you’re fighting a door boss, that will be uploaded when it’s dead even though the instance is not over)
(skip) Viewing the Data
After you click the blue
Gobutton on either this or the previous screen, there will be two large blue button options that sayView.The one that says
In Appwill just open the report in this window you’re in.
Installing Penumbra
First we need to add the repository from which we will install the plugin.
Open Dalamud settings in FFXIV and head to the Experimental tab.
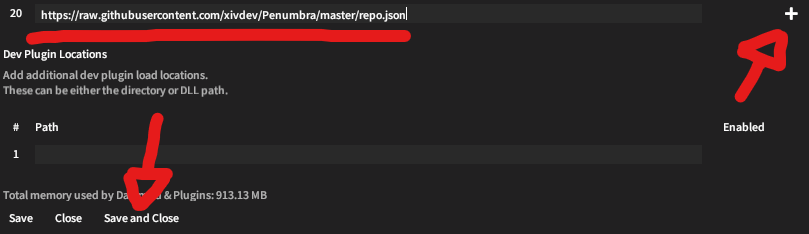
Scroll to the text boxes and paste in this repository URL:
https://raw.githubusercontent.com/xivdev/Penumbra/master/repo.json
Click the plus sign on the right of the text box, and save and close the settings window.
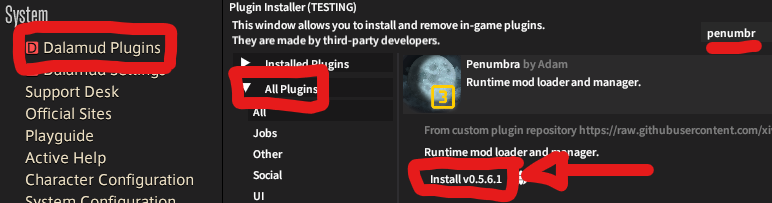
Open Dalamud Plugins Installer, and navigate to All Plugins.
Search for and install Penumbra.
Configuring Penumbra
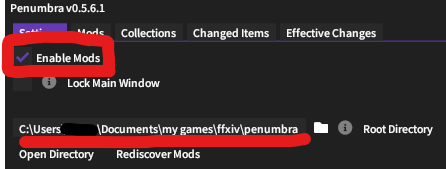
Open Penumbra via chat command /penumbra (or clicking the gear that appears after install right next to where the install button was).
It should open to the Settings tab, otherwise navigate to it.
Make sure that Enable Plugins is checked.
You will need a directory for Penumbra to store its plugins in. If you look at the picture I set up a directory in a different place, but the shorter the better, so I recommend:
[my user]\penumbra
Click the folder icon to select the folder you made, or paste it’s full path in and press enter.
Save it.
(skip) Where to Make the Penumbra Folder
I highly recommend:
C:\Users\[username]\penumbra.
NOT:
\My Games\FINAL FANTASY XIV - A Realm Reborn, don’t use SE’s folder.NOT: in your FFXIV install files, same reason.
NOT: in your Dalamud files, these are volatile.
NOT: in your Downloads folder, will likely cause issues.
Configuring Penumbra Mods
To get started with adding mods to Penumbra I will provide an example one to use.
Download this “Improved Waymarks” plugin.
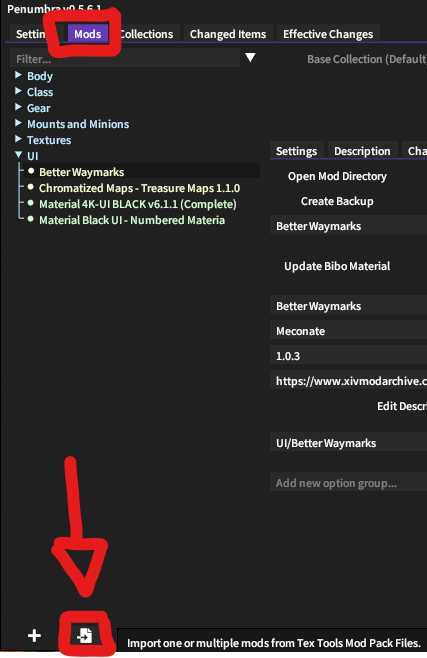
Go to the Mods tab and click the Import button along the bottom.
This will open the import dialog where you can choose your .ttmp2 file to import.
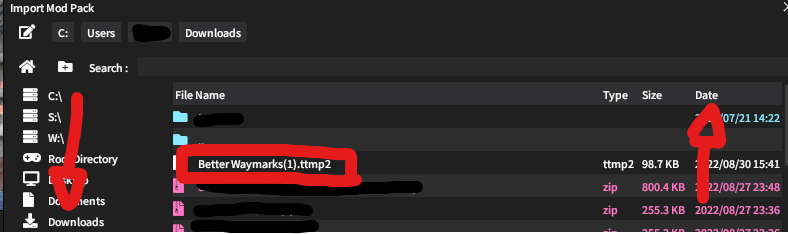
Navigate to your downloads folder and sort its contents by date if not already the case.
Double click the mod to import it.
Now the mod will import in a popup, which you can close when it’s done.
Then the mod will be in your list of mods
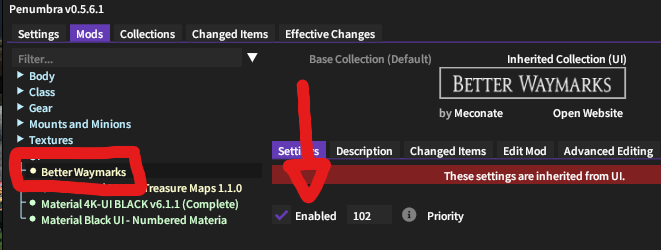
Click the mod in the list.
Once clicked you will see any configuration options for the mod and the option to enable it.
Enable it.
At this point the next time the assets that the mod changes are requested by the game it will fetch the new ones; you can trigger this manually by walking in and out of an area for most mods, or restarting the game for some mods such as most UI mods.
You can also force this by using the chat commands:
/penumbra redraw selfyourself/penumbra redraw targetyour target/penumbra redraweveryone
(skip) Advanced Mods
For more advanced options for your mod, such as converting a mod’s items I would recommend this guide from Serenity.
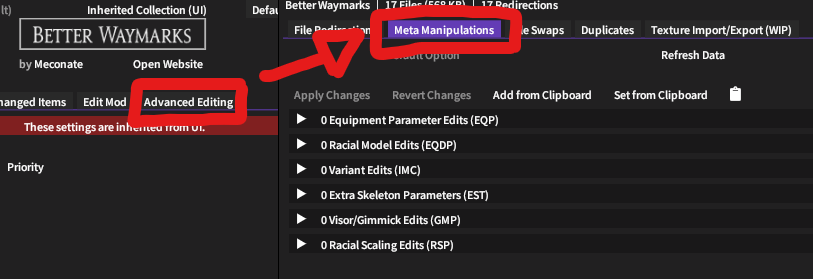
As for meta data editing, it is fairly simple.
Just open the
Advanced Editingtab in the mod, and go to theMeta Manipulationtab in the popup window to do so.
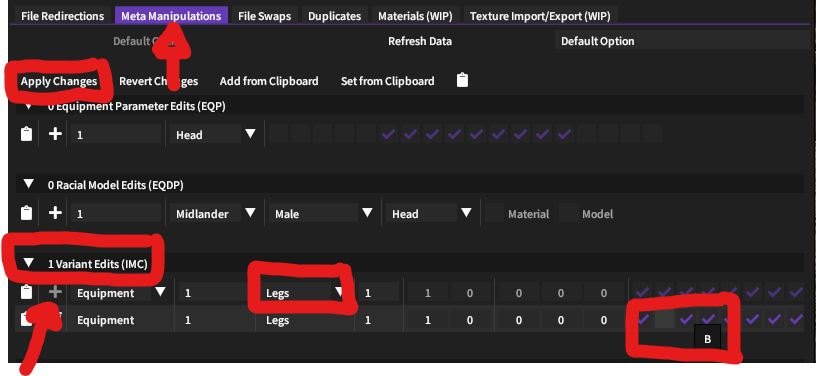
Once in the
Meta Manipulationtab you can edit the meta data for the mod.It’s broken into the different sections of meta data in TexTools, and you can click the
+button to stage a new meta edit - choose what it should affect, click the button, then you can choose the options.Click
Applyin the top left.
For Item Conversion you can try to follow this guide from Serenity
Personally, I’m going to wait until Penumbra makes it super simple - right now it can work but it’s not straight forward and I know that’s something they’re working on. After all, a couple months ago the
Advanced Editingtab didn’t even exist.
Organizing Penumbra Mods
Link
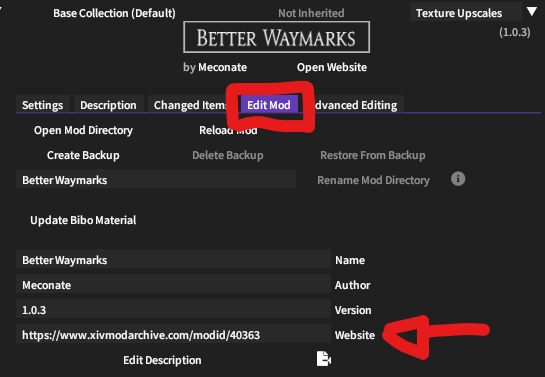
I find it incredibly useful to save the link to where I found a mod when I first add and enable it.
Especially for gear mods when you want to go find more sets from the author, or check for an update to a mod, for example.
Just select your mod.
Go to the Edit tab.
Paste in the link.
Folders
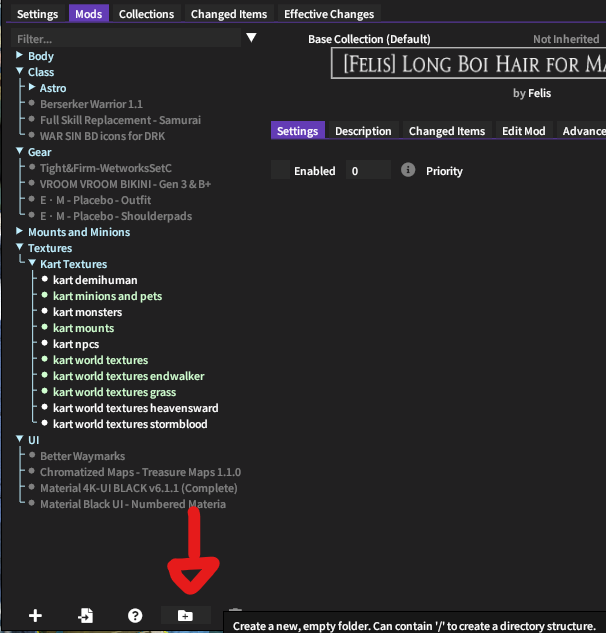
First, organizing your mods into folders is a simple step to do early on that will make having dozens or hundreds of mods much less of a headache.
There’s a Create a Folder button along the bottom, use this, and you can move mods into it.
The caveat comes from this is the only way to add folders: you can’t right-click a folder to add a sub folder, you still use this.
To make the Astro sub folder like you see in this picture you just create a Class folder then make a Class/Astro folder, and the latter is a child of the former.
Collections
For more information about this section and its uses check out this guide from Serenity.
Collections is a way to organize your mods into groups to toggle on and off at will, or using the next section you can create a base of mods that each of you characters can use on top of the character-specific mods.
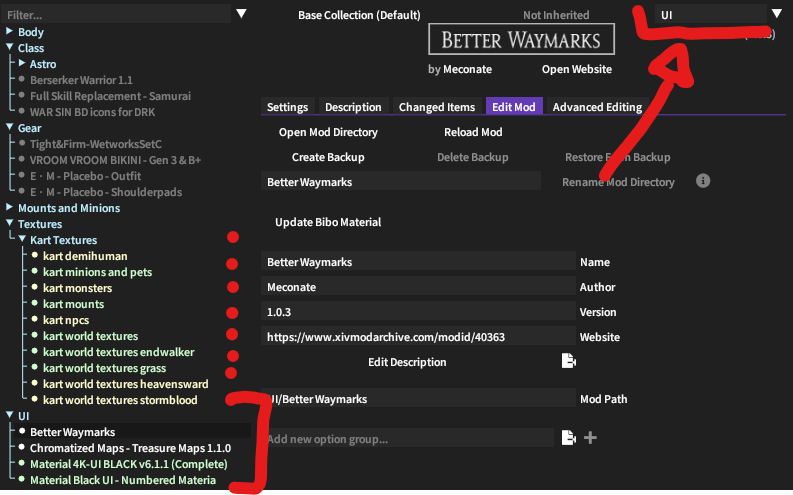
In this picture you see the UI folder is highlighted.
This folder of mods all belong to the UI collection which you can select in the top right dropdown.
Additionally, you can see the dots along the Textures folder, which is a separate collection that UI inherits from …
Inheritance
For more information about this section check out this guide from Serenity.
When a collection inherits another, the enabled mods in the inherited collection are enabled in the parent collection as well.
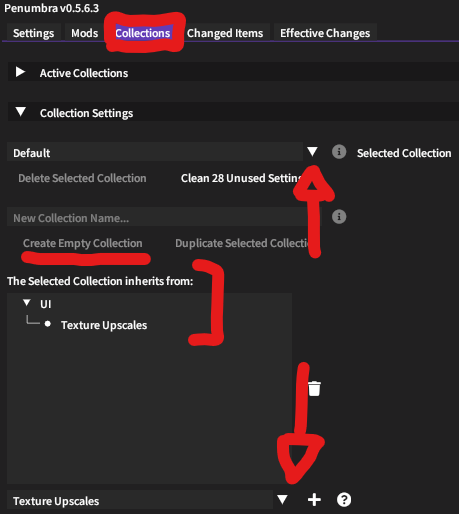
If you go into the Collections tab, you can set up new collections to create the structure shown above.
You can use the underlined button and textbox to add your own.
You can select the one you made from the dropdown I point to in the middle.
In the bracketed area you can see an example structure, where my Default collection (my main character) inherits from the UI collection, which in turn inherits from the Textures collection.
Create an inheritance with the plus button pointed to at the bottom.
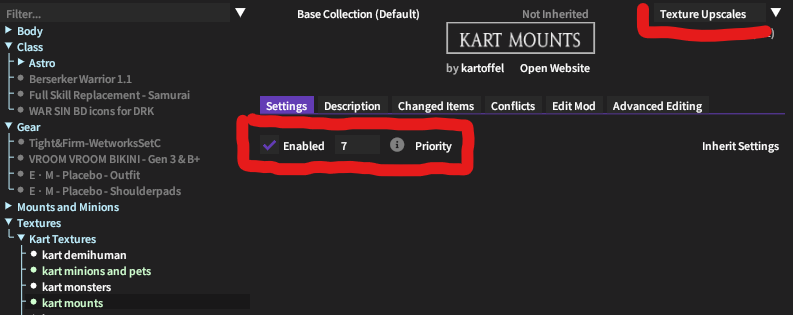
When you have a collection selected you can click into a mod and enable it to turn it on for that collection.
Of note is that this will not disable it in any other collection, I would recommend to only have a mod enabled in one collection at a time. If you have it enabled in multiple collections then that would indicate to me that they could be in a collection of their own - eg if you use a body mod in 2 different character-specific collections then those collections should maybe instead inherit a body collection for example.
You can also see from the picture that in this case I have a priority on the mod of 7. This is used for de-conflicting mods that overwrite each other. In this case the mounts texture mod should overwrite the little data that it shares with the minion texture mod, so I set it to have a higher priority.
Installing XIVAlexander
Configuring XIVAlexander
Installing Anamnesis
Configuring Anamnesis
Posing with Anamnesis
Installing GShade
Configuring GShade
Shading with GShade
Installing Gobchat
Configuring Gobchat
Commentary on Mods Included in the Guide
There are 2 notable alternative pieces of software written in this guide that may be a head-scratcher to those used to recommending the others, and those would be Anamnesis instead of CMTool and Penumbra instead of TexTools.
Interestingly, in both of these cases, I chose the alternatives for the same reasons of disliking how the developers manage communication with their communities, their lack of speed in getting out workable updates, and the user-friendliness of their software.
Beyond that, another one might be the FF Logs Companion instead of the FF Logs Uploader desktop app. That’s just a matter of opinion, but I prefer the uploader be in game instead - it’s actually a fair bit clunkier, but that’s where I want to use the software, and it is much more convenient.
Closing
If you made it to this point then thank you for taking the time to read through this, and I hope that everything worked out well for you and that it continues to do so and that you enjoy it!
If you are in need of any assistance, and you did in fact read through at least the entire “section” you need help with, then you can contact me on Discord.